
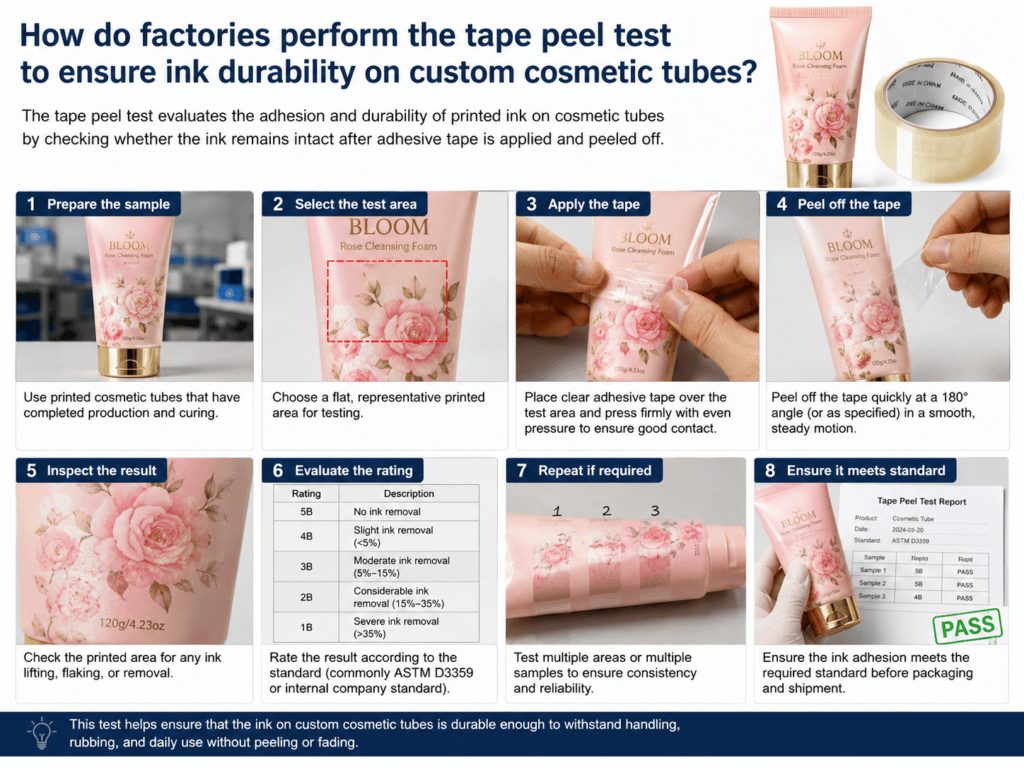
Factories usually perform the tape peel test on custom cosmetic tubes by applying standardized adhesive tape to a printed test area and then removing it quickly to see whether any ink lifts, flakes, or peels away. In practice, many packaging and coating teams use a tape-adhesion method based on the same logic as ASTM D3359 or ISO 2409 cross-hatch testing, especially when they need a fast production-line check for print durability.
For cosmetic tubes, the goal is simple: confirm that the printed ink is bonded strongly enough to survive filling, sealing, transport, rubbing, and consumer handling. If the tape removes ink, causes edge lifting, or exposes weak adhesion, the print system usually needs improvement before mass production continues.
How the Tape Peel Test Is Usually Performed
| Step | What the Factory Does | Why It Matters |
|---|---|---|
| 1. Select printed sample area | Choose a fully cured printed area on the cosmetic tube | Ensures the test reflects the final decoration quality |
| 2. Prepare the surface | Make sure the print area is clean and dry | Prevents false results caused by dust or oil |
| 3. Score if using cross-hatch method | Cut a small grid through the ink layer with a cross-hatch cutter | Creates a more demanding adhesion check |
| 4. Apply the tape | Press the adhesive tape firmly over the printed or cross-hatched area | Ensures full tape contact with the tested coating |
| 5. Peel the tape off | Remove the tape quickly at a controlled angle | Reveals whether the ink lifts from the tube surface |
| 6. Inspect the result | Check whether any ink, coating, or flakes transferred onto the tape | Determines whether print adhesion is acceptable |
What Factories Look For After Peeling the Tape
- No ink removal: The best result is a clean tape with no visible ink lift.
- No edge chipping: Fine letters, logos, and line edges should remain intact.
- No flaking in the grid: If using cross-hatch cuts, the small squares should stay bonded.
- No partial detachment: Even minor lifting can indicate weak adhesion that may fail later during filling or shipping.
Simple Tape Test vs Cross-Hatch Tape Test
| Test Type | How It Works | Typical Use |
|---|---|---|
| Simple tape peel test | Tape is applied directly onto the printed surface and peeled away | Quick in-line or shop-floor screening |
| Cross-hatch tape test | A grid is cut into the coating first, then tape is applied and removed | More structured adhesion evaluation |
Why the Tape Peel Test Is Important for Cosmetic Tubes
- Cosmetic tubes are flexible: The print must survive squeezing and handling.
- Automated filling lines create friction: Weakly bonded ink may fail during production.
- Sealing areas experience heat and stress: Adhesion problems can become worse after filling and sealing.
- Brand appearance matters: Peeling or flaking print immediately reduces product quality perception.
Common Reasons a Tube Fails the Tape Test
| Failure Cause | Typical Result |
|---|---|
| Insufficient surface treatment | Ink does not bond strongly to PE tube surface |
| Incomplete curing | Ink film remains weak and lifts under tape |
| Wrong ink for substrate | Adhesion is unstable or inconsistent |
| Contamination before printing | Oil, silicone, or dust blocks proper bonding |
| Poor process control | Some batches pass while others fail |
How Manufacturers Improve Tape Test Results
- Use proper flame or corona treatment before printing
- Match the ink system to the exact tube substrate
- Confirm full curing before testing and before filling
- Keep the tube surface clean during printing and handling
- Run adhesion checks regularly during production, not only at the end
Best Practice for Custom Cosmetic Tube Projects
For custom cosmetic tubes, the tape peel test should be treated as a routine durability check rather than a one-time lab formality. The most reliable factories test printed tubes before shipment and often again after filling-line simulation, especially for PE tubes, matte finishes, metallic inks, and premium decoration where adhesion problems are more visible.
Summary
Factories perform the tape peel test on custom cosmetic tubes by pressing adhesive tape onto a printed test area and removing it to check whether the ink lifts, flakes, or peels. In stricter versions, they first cut a cross-hatch grid into the print and then apply the tape. The test helps confirm whether the ink adhesion is strong enough for filling, sealing, transport, and real consumer use.
For cosmetic tube printing, a good tape test result usually means the print system, surface treatment, and curing process are working together correctly.
Learn more: Quality Assurance, Printing Options, Silk Screen Printing Tubes, Offset Printing Tubes, Corona Treatment for PE Squeeze Tubes, Tube Decoration.
Need Better Ink Durability on Custom Cosmetic Tubes?
Xinfly Packaging helps brands improve print adhesion through better surface treatment, ink selection, curing control, and quality testing so cosmetic tube decoration stays cleaner and more durable in real production.