
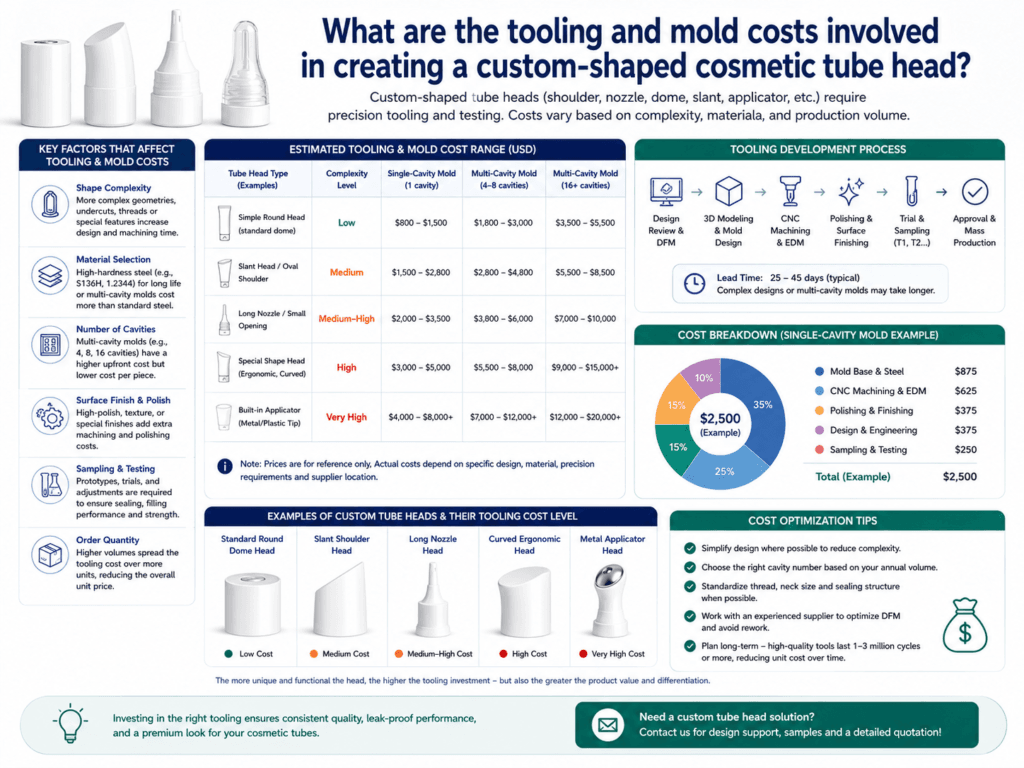
Creating a custom-shaped cosmetic tube head usually involves tooling and mold costs for the tube shoulder/head, cap matching, thread structure, sealing surface, and sometimes filling-machine compatibility. The cost depends on whether the brand only modifies an existing head style or develops a completely new shape from scratch.
In most cosmetic tube projects, standard tube heads and caps use existing molds, so there may be no new mold fee. But if the brand wants a unique oval head, special nozzle, custom applicator, non-standard shoulder shape, special thread, or exclusive cap-to-head system, new tooling may be required. Industry examples often place simple custom tube tooling in the hundreds to several thousand dollars range, while more complex injection molds for packaging components can reach much higher depending on cavity count, steel type, tolerance, and complexity.
What Is a Custom-Shaped Tube Head?
A custom-shaped tube head refers to the molded shoulder and neck area at the top of the tube. This part connects the tube body to the cap, nozzle, pump, applicator, or dispensing system. It affects not only appearance, but also sealing performance, filling compatibility, product dispensing, leakage control, and cap fit.
| Tube Head Feature | Why It Matters |
|---|---|
| Shoulder shape | Controls the transition from tube body to neck and affects visual style |
| Neck diameter | Affects filling speed, product dispensing, and cap compatibility |
| Thread design | Determines whether the cap screws on smoothly and seals correctly |
| Sealing surface | Helps prevent leakage after filling, transport, and consumer use |
| Applicator connection | Important for nozzle tubes, metal tips, rollerballs, and special dispensing heads |
What Costs Are Usually Involved?
| Cost Item | What It Covers | When It Applies |
|---|---|---|
| Design and engineering cost | 3D drawing, DFM review, tolerance checking, cap/head fit analysis | When the head shape is new or technically modified |
| Prototype or sample mold cost | Trial tooling or early-stage validation parts | When the structure needs testing before production mold |
| Production mold cost | Main mold for mass production of the tube head or related parts | When an exclusive custom head is required |
| Cap or closure mold cost | Custom flip-top, screw cap, nozzle cap, applicator part, or decorative cover | When the standard cap cannot fit the custom head |
| Testing and adjustment cost | Leakage, torque, sealing, filling, drop, compatibility and revision tests | When production validation is required before mass order |
Typical Cost Range by Customization Level
| Customization Level | Typical Tooling Situation | Cost Direction |
|---|---|---|
| Use existing head and cap | No new head mold; only color, printing, finish, or tube body customization | Lowest cost |
| Modify an existing head style | Small tooling adjustment or partial mold work may be needed | Low to medium |
| New custom-shaped tube head | New production tooling for shoulder/head structure | Medium to high |
| Custom head plus custom cap/applicator | Multiple molds may be needed for head, cap, insert, nozzle, or applicator | Highest cost |
Practical note: The mold fee is not only for the visible shape. It also pays for engineering accuracy, cap fit, sealing reliability, production stability, and repeatable mass manufacturing.
Why Custom Tube Head Molds Can Be Expensive
- Precision is required: Small errors in thread, neck height, or sealing surface can cause leakage or poor cap fit.
- The head must match the tube body: The shoulder must weld or form correctly with the tube body material.
- Caps and applicators must be compatible: A custom head may require a custom cap or insert.
- Production tools must be durable: Mass production molds need stable output over repeated cycles.
- Testing and revisions are common: Functional packaging parts often need adjustment after the first trial.
What Affects the Final Mold Cost?
| Factor | Cost Impact | Why |
|---|---|---|
| Shape complexity | High | Special contours, undercuts, or unusual dispensing paths make tooling harder |
| Thread and sealing tolerance | High | Leakage prevention requires accurate fit with the cap or applicator |
| Number of components | High | Head, cap, insert, plug, nozzle, or applicator may each require tooling |
| Cavity number | Medium to high | More cavities improve output but increase mold cost |
| Material and mold steel | Medium | Production molds usually need stronger material than simple prototype tools |
| Revision rounds | Medium | Each adjustment may add time and engineering cost |
When Is a New Mold Worth It?
A new custom tube head mold is usually worth considering when the packaging shape directly supports brand differentiation, formula dispensing, user experience, or technical performance. For example, a premium eye cream tube with a special applicator head, a sunscreen tube with a controlled nozzle, or a skincare tube with an exclusive shoulder profile may justify the tooling investment if the expected order volume is high enough.
| Project Situation | Is New Mold Recommended? | Reason |
|---|---|---|
| Startup testing a first product | Usually not first choice | Existing molds reduce cost and launch risk |
| Brand wants unique shelf identity | Possible | Custom head shape can strengthen visual differentiation |
| Formula needs special dispensing | Often yes | Nozzle, applicator, or outlet design may require custom tooling |
| Large repeat-volume project | More reasonable | Tooling cost can be amortized over multiple production runs |
| Only logo or color needs customization | No | Printing, color, and finish can usually use existing molds |
How MOQ Affects Mold Cost Decisions
Mold cost should be evaluated together with order volume. If the order quantity is small, the mold fee adds a large cost per tube. If the same mold is used for repeated production runs, the tooling cost can be spread across more units, making the project more economical over time.
| Order Volume | Tooling Impact | Practical Advice |
|---|---|---|
| Low MOQ trial order | Mold fee may make unit cost too high | Use existing molds and customize printing/finish first |
| Medium-volume launch | Partial customization may be possible | Modify only the most visible or functional component |
| High-volume repeat order | New mold becomes more reasonable | Custom head design can create long-term brand value |
How to Reduce Tooling Cost
- Start from an existing tube head: Modify color, finish, printing, or cap combination before opening a new mold.
- Avoid unnecessary undercuts: Complex mold actions increase tooling cost and production risk.
- Use standard thread sizes: This improves cap compatibility and reduces custom cap tooling.
- Customize one key component: A special cap or applicator may be enough without redesigning the whole head system.
- Confirm DFM early: Design-for-manufacturing review can reduce mold revisions and delays.
- Plan repeat orders: Tooling investment is easier to justify when the mold will support long-term production.
Development Process for a Custom Tube Head
| Step | What Happens | Key Output |
|---|---|---|
| 1 | Define formula, dispensing, cap, and appearance goals | Functional design brief |
| 2 | Check existing mold options | Decision: use stock mold or open new tooling |
| 3 | Create 3D drawing and DFM review | Manufacturable tube head design |
| 4 | Make prototype or trial tooling if needed | First physical sample |
| 5 | Test cap fit, leakage, filling, sealing, and dispensing | Validated or revised structure |
| 6 | Build production mold and confirm mass-production samples | Approved production-ready packaging |
Best Practical Recommendation
If your goal is only a unique look, start with an existing head and invest in color, printing, surface finish, or cap decoration first. If your product needs a special dispensing function, applicator experience, or exclusive brand shape, then a custom tube head mold may be worth the investment. The key is to confirm whether the mold creates real value in brand recognition, product function, or long-term production economics.
Summary
Tooling and mold costs for a custom-shaped cosmetic tube head can include design engineering, prototype tooling, production mold, cap or applicator mold, testing, and adjustment. The final cost depends on shape complexity, thread and sealing tolerance, number of components, cavity count, mold material, and expected production volume.
For many brands, the most cost-effective strategy is to use an existing head mold and customize the tube through printing, color, finish, and cap selection. A fully custom-shaped tube head is best reserved for products with strong brand differentiation, special dispensing requirements, or high-volume repeat production.
Learn more: Customization, Customize Cosmetic Tubes, Caps & Closures, Nozzle Tubes, Cosmetic Airless Pump Tubes, Sample Development.
Need a Custom-Shaped Tube Head Without Overpaying for Tooling?
Xinfly Packaging helps brands compare existing molds, partial customization, and full custom tube head tooling to balance brand uniqueness, mold cost, MOQ, testing risk, and mass-production stability.